Membrane-associated protein docking
This is a complete example of the LightDock docking protocol to model the 2HDI membrane-associated protein system with the use of an implicit membrane representation provided by the MemProtMD database.
IMPORTANT Please, make sure that you have the python3 version of LightDock installed (pip3 install lightdock). We advise you to follow the basic tutorial about how to run a quick LightDock simulation
Here, we provide a complete step-by-step guide to model the interaction between the Colicin I receptor Cir (beta-barrel) in complex with receptor binding domain of Colicin Ia.
1. Copying the data
Create a directory and copy the sample data provided.
cd ~
mkdir test
cd test
curl -O https://raw.githubusercontent.com/haddocking/MemCplxDB/master/structures/2hdi/2hdi_unbound_A.pdb
curl -O https://raw.githubusercontent.com/haddocking/MemCplxDB/master/structures/2hdi/2hdi_unbound_B.pdb
curl -O https://raw.githubusercontent.com/lightdock/lightdock.github.io/master/tutorials/examples/2HDI/2hdi-coarsegrain.pdb
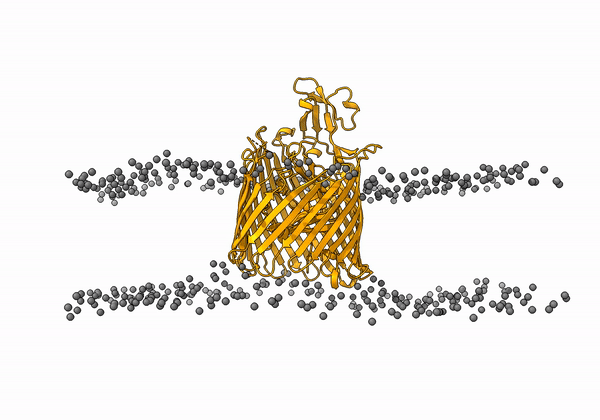
Where 2hdi_unbound_A.pdb corresponds to the beta-barrel receptor structure, 2hdi_unbound_B.pdb is the receptor binding domain and 2hdi-coarsegrain.pdb the representative coarse-grained snapshot of the 2HDI receptor.
2. Pre-processing of input structures
Next, we need to prepare the input structures.
- Remove all CG beads except those representing the phosphate beads
grep -v "C4B" 2hdi-coarsegrain.pdb | grep -v "C3B" | grep -v "C2B" | grep -v "C1B" | grep -v "C4A" | grep -v "C3A" | grep -v "C2A" | grep -v "C1A" | grep -v "GL2" | grep -v "GL1" | grep -v "NC3" >> 2hdi-phosphate.pdb
- Remove all ions and water molecules since these are not parametrized in the scoring function
grep -v "ION" 2hdi-phosphate.pdb | grep -v " W " | grep -v "CONECT" >> 2hdi-phosphate-clean.pdb
- Rename CG backbone beads to CA atoms in order to superimpose the atomistic structure
sed "s/B... /CA /g" 2hdi-phosphate-clean.pdb | sed "s/5B.. /CA /g" | sed "s/0BTN/CA /g" | sed "s/0BEN/CA /g" | sed "s/0BHN/CA /g" >> 2hdi-phosphate-clean-CA.pdb
- Rename phosphate beads
sed "s/ PO4/BJ /g" 2hdi-phosphate-clean-CA.pdb | sed "s/DPPC/ MMB /g" >> 2hdi-phosphate-clean-CA-BJ.pdb
- Replace CG transmembrane domain by the atomistic one
Open 2hdi_unbound_A.pdb and 2hdi-phosphate-clean-CA-BJ.pdb with PyMol:
pymol 2hdi_unbound_A.pdb 2hdi-phosphate-clean-CA-BJ.pdb
and run the following command in the Pymol command line interface:
align 2hdi_unbound_A and name CA, 2hdi-phosphate-clean-CA-BJ and name CA
Now, do save each of the molecules as 2hdi_unbound_A_aligned.pdb and 2hdi-phosphate-clean-CA-BJ_aligned.pdb (PyMOL>File>Export Molecule…).
IMPORTANT: Select the proper PDB file extension PDB (*\.pdb *\pdb.gz)
Finally, combine both files
grep "MMB" 2hdi-phosphate-clean-CA-BJ_aligned.pdb >> membrane.pdb
cat 2hdi_unbound_A_aligned.pdb membrane.pdb >> receptor_membrane.pdb
- Remove all remaining files
rm 2hdi-phosphate.pdb 2hdi-phosphate-clean.pdb 2hdi-phosphate-clean-CA.pdb 2hdi-phosphate-clean-CA-BJ.pdb 2hdi_unbound_A_aligned.pdb 2hdi-phosphate-clean-CA-BJ_aligned.pdb membrane.pdb
An animation of the receptor embedded into the bead bilayer can be found below:
3. Setup
First, we need to run the setup step. We will specify a number of 400 initial swarms and 200 glowworms. We will exclude the terminal oxygens and ALL hydrogens (not parametrized in fastdfire scoring function).
At this step we will enable the membrane mode. (-membrane)
lightdock3_setup.py receptor_membrane.pdb 2hdi_unbound_B.pdb 400 200 --noxt --noh -membrane
[lightdock_setup] INFO: Ignoring OXT atoms
[lightdock_setup] INFO: Ignoring Hydrogen atoms
[lightdock_setup] INFO: Reading structure from receptor_membrane.pdb PDB file...
[pdb] WARNING: Possible problem: [SideChainError] Incomplete sidechain for residue ARG.111
[pdb] WARNING: Possible problem: [SideChainError] Incomplete sidechain for residue LYS.212
[pdb] WARNING: Possible problem: [SideChainError] Incomplete sidechain for residue ARG.643
[pdb] WARNING: Possible problem: [SideChainError] Incomplete sidechain for residue ASN.649
[lightdock_setup] INFO: 5155 atoms, 1056 residues read.
[lightdock_setup] INFO: Ignoring OXT atoms
[lightdock_setup] INFO: Ignoring Hydrogen atoms
[lightdock_setup] INFO: Reading structure from 2hdi_unbound_B.pdb PDB file...
[lightdock_setup] INFO: 810 atoms, 103 residues read.
[lightdock_setup] INFO: Calculating reference points for receptor receptor_membrane.pdb...
[lightdock_setup] INFO: Done.
[lightdock_setup] INFO: Calculating reference points for ligand 2hdi_unbound_B.pdb...
[lightdock_setup] INFO: Done.
[lightdock_setup] INFO: Saving processed structure to PDB file...
[lightdock_setup] INFO: Done.
[lightdock_setup] INFO: Saving processed structure to PDB file...
[lightdock_setup] INFO: Done.
[lightdock_setup] INFO: Calculating starting positions...
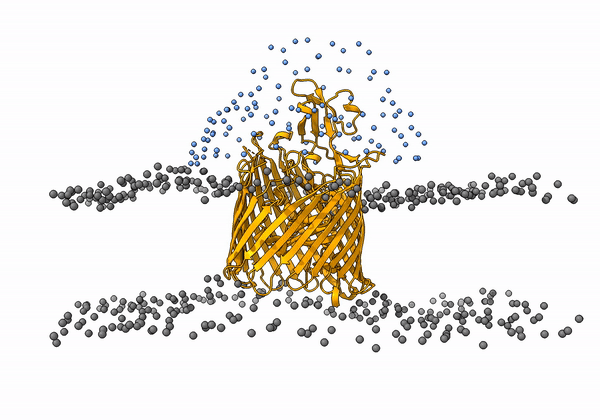
[lightdock_setup] INFO: Generated 115 positions files
[lightdock_setup] INFO: Done.
[lightdock_setup] INFO: Number of swarms is 115 after applying restraints
[lightdock_setup] INFO: Preparing environment
[lightdock_setup] INFO: Done.
[lightdock_setup] INFO: LightDock setup OK
At first glance, we see that the initial number of specified swarms (400) has been reduced to 115. This means that 285 swarms have been removed as they are incompatible with the topological information provided by the membrane.
Please note, that while we have not specified any residue restraint for the current example, the membrane mode (-membrane) is totally compatible with this feature. For more info, please check our antibody example.
An animation of the setup, with the geometrical centers of the swarms depicted in blue, can be found below:
4. Simulation
We can run our simulation in a local machine or in a HPC cluster. For the first option, simply run the following command:
lightdock3.py setup.json 100 -s fastdfire -c 8
Where the flag -c 8 indicates LightDock to use 8 available cores. For this example we will run 100 steps of the protocol and the C implementation of the DFIRE function -s fastdfire.
To run a LightDock job on a HPC cluster, a Portable Batch System (PBS) file can be generated. This PBS file defines the commands and cluster resources used for the job. A PBS file is a plain-text file that can be easily edited with any UNIX editor.
For example, create a submit_job.sh file containing:
#PBS -N LightDock-2HDI
#PBS -q medium
#PBS -l nodes=1:ppn=16
#PBS -S /bin/bash
#PBS -d ./
#PBS -e ./lightdock.err
#PBS -o ./lightdock.out

lightdock3.py setup.json 100 -s fastdfire -c 16
This script tells the PBS queue manager to use 16 cores of a single node in a queue with name medium, with job name LigthDock-2HDI and with standard output to lightdock.out and error output redirected to lightdock.err.
To run this script you can do it as:
qsub < submit_job.sh
At this stage, we provide a compressed folder 2HDI-lightdock with the output of the simulation, so that you can continue directly with the analysis.
5. Analysis
Once the simulation has finished, we need to analyze theresults as:
- Generate the structures per swarm (200 glowworms per swarm in this example)
- Cluster the predictions per swarm
- Generate the ranking files
Here there is a PBS script to do so:
#PBS -N 2HDI-anal
#PBS -q medium
#PBS -l nodes=1:ppn=8
#PBS -S /bin/bash
#PBS -d ./
#PBS -e ./analysis.err
#PBS -o ./analysis.out

### Calculate the number of swarms ###

s=`ls -d ./swarm_* | wc -l`
swarms=$((s-1))

### Create files for Ant-Thony ###

for i in $(seq 0 $swarms)
  do
    echo "cd swarm_${i}; lgd_generate_conformations.py ../receptor_membrane.pdb ../2hdi_unbound_B.pdb  gso_100.out 200 > /dev/null 2> /dev/null;" >> generate_lightdock.list;
  done

for i in $(seq 0 $swarms)
  do
    echo "cd swarm_${i}; lgd_cluster_bsas.py gso_100.out > /dev/null 2> /dev/null;" >> cluster_lightdock.list;
  done

### Generate LightDock models ###

ant_thony.py -c 8 generate_lightdock.list;

### Clustering BSAS (rmsd) within swarm ###

ant_thony.py -c 8 cluster_lightdock.list;

### Generate ranking files for filtering ###

lgd_rank.py $s 100;

### Copy structures for further analysis ###

lgd_copy_structures.py rank_by_scoring.list > /dev/null 2> /dev/null;
NOTE You can also run the previous commands locally in a sequential way.
Once the analysis is finished, a new folder called clustered has been created, which contains the predicted structures. Inside of this directory, there is a file with the ranking of these structures by LightDock DFIRE (fastdfire) score (the more positive the better) rank_clustered.list.
We provide for this example a compressed clustered folder clustered.tgz which contains (when decompressed) a ranking lgd_clustered_rank.list file together with the top 100 LightDock predictions.
For all the filtered structures, interface RMSD (i-RMSD), ligand RMSD (l-RMSD) and fraction of native contacts (fnc) according to CAPRI criteria have been calculated.
head lgd_clustered_rank.list
# structure		fnc 		i-RMSD  l-RMSD	Score
swarm_43_170.pdb	0.409639	2.185	6.910	28.431
swarm_18_50.pdb		0		14.745	29.396	27.645
swarm_55_140.pdb	0		15.434	32.565	27.554
swarm_45_194.pdb	0		15.537	48.099	27.373
swarm_11_156.pdb	0.0963855	9.740	27.417	26.849
swarm_112_26.pdb	0		16.233	32.469	26.366
swarm_92_122.pdb	0		15.928	30.716	26.022
swarm_33_43.pdb		0.0722892	5.512	20.906	25.714
swarm_112_178.pdb	0		15.599	32.351	25.138
swarm_18_160.pdb	0		11.311	22.666	25.006
LightDock is also available in the Rust programming language, which significantly accelerates the simulations and fully supports membrane docking.
References
For a more complete description of the algorithm as well as different tutorials, please refer to LightDock, or check the following references:
-
Integrative Modeling of Membrane-associated Protein Assemblies
Jorge Roel-Touris, Brian Jiménez-García & Alexandre M.J.J. Bonvin
Nat Commun 11, 6210 (2020); doi: https://doi.org/10.1038/s41467-020-20076-5 -
LightDock goes information-driven
Jorge Roel-Touris, Alexandre M.J.J. Bonvin and Brian Jiménez-García
Bioinformatics, Volume 36, Issue 3, 1 February 2020, Pages 950–952, doi: https://doi.org/10.1093/bioinformatics/btz642 -
LightDock: a new multi-scale approach to protein–protein docking
Brian Jiménez-García, Jorge Roel-Touris, Miguel Romero-Durana, Miquel Vidal, Daniel Jiménez-González and Juan Fernández-Recio
Bioinformatics, Volume 34, Issue 1, 1 January 2018, Pages 49–55, doi: https://doi.org/10.1093/bioinformatics/btx555